
It’s like a sense of pride, one feels it when something which one built climbs towards the sky. Well, one toy that’s singularly hers and mine, in which both the player and the maker are the same person, is a kite: In one minute she’ll know if she’ve got it right or not; you cut it, you balance it.
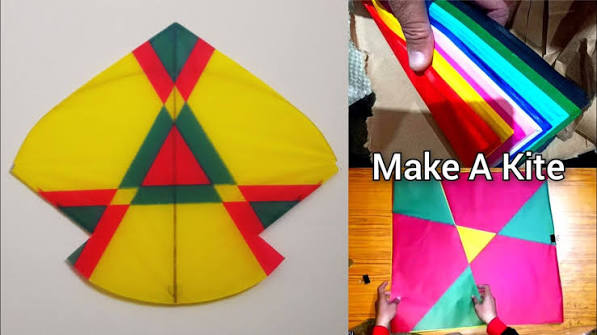
This guide shows you how to make a kite the traditional way, with a bamboo frame, thin paper and cotton thread. This is the way Lahore’s kite makers have been operating for generations and master kite makers, known as ustaads, whose skill lay in getting the balance just right are described by Dawn. You won’t be able to match your ustaad the first time, but you get a flying kite the first time.
There is also a kite shown below which is a plain diamond shape patang approximately 35 to 40cm across. Traditionally, the kite size is built to be about 30-40 cm wide (The Kite Society). An hour or so, and a spare – the second one is always better!
What you need
- Two thin bamboo splints, one straight for the backbone (approx. 40cm) and the other thinner and more flexible for the bow (approx. 35cm). Traditionally, bamboo has been used because it bends; there isn’t a natural alternative to the kite society.
- Thin, light and un-stretchy tissue / kite paper. A heavy paper requires long tails and has a hard time in light breeze (My Best Kite).
- Cotton thread for tying the frame and making the bridle.
- Use a plain cotton string for flying line.
- Thin paste, scissors, ruler and pencil. Use of bamboo (can be difficult): A crafts knife will be helpful but use by adult.
Basic instructions for making a kite step by step
These are merely guidelines and not law. Traditional makers work by eye and by feel, and you will after two or three kites!
1. Prepare the frame.
Smooth splints, don’t rip paper or fingers.
(On the spine and the bow cross you just go under it, like a walk across. A common site to mark the spine is about a third of the way down from the top of the kite (where a diamond kite is likely to be flown). Place the bow in the centre and lash tight in a figure of 8, and apply a small ointment of glue.
3. Pick up and pass the outline thread.
Take care that each edge of the four corners is notched, and a thread wrapped around the edges and pulled snug into a diamond shape. Use this thread to make the paper more interesting and to prevent the paper from tearing at the edges (My Best Kite).
4. Check the symmetry.
Hold the frame by the top tip. The bow should be balanced in the middle. There are a number of problems that can occur with flying where most of them start here if not all, so tidy it up now.
5. Cover the frame.
Take the paper slightly bigger than the frame, apply thin paste on the outline thread, fold the paper over the outline thread and flatten. Wrinkle, a thing that forces everyone to take a breath, a nuisance in the air.
6. Curve the bow.
Bend the bow slightly backwards and secure it with a thread to the two ends keeping it in a curve. The kite is shaped with bamboo bows (The Kite Society). Minimal curves are sufficient.
7. Make the bridle.
Make two separate cuts, one at either side of the spine and tie a string to the frame at each. Usually, Indian kites for fighting are hung with 2-point bridle, which is combined in one knot, through which the flying line passes (The Kite Society). Make a small loop for later to slide the knot through.
9. If there is need for a tail, add it!
Usually, the beginners prefer to ride on a short paper strip for stability on the initial flights; however, pioneer kite-fliers allow their kites to ride without a tail. (The Kite Society) Begin three to four times the length of the kite and get shorter once you have some success.
9. Test the balance.
Hold the kite by the bridle knot. Trim a little bamboo or paper that’s thicker on the side that’s sagging for it to hang level.
For a first time bamboo and tissue seems to be too difficult, a simpler one is available in a free plan that uses bamboo skewers and a plastic bag – approximately 58cm across (Kiteplans).
Your first kite up! Your first time up in the air!
Find a place where there are no obstructions and there is a steady wind with the wind from behind you; release line as the kite rises. Do not come under power lines, roads or trees. During Basant 2026 in Lahore, 17 deaths have been reported with 12 of them being from roof tops, three being electrocution accidents and two from trees (Dawn).
When the kite spins or dives, put it down and make one change at a time – either the bridle knot, the length of the tail or the bow.
Safety and the rules in Punjab
Only use plain cotton string. According to Basant rules of Lahore, nylon, Zameen, metal, glass coated and chemically treated string was prohibited, and so were the charkhis. Don’t soak string in. That’s why it was banned in 2007.
Be familiar with the law before making kites in numbers. The prohibition on kite making, storage and sale without official permits started in the Punjab, and would include three to five years jail and up to Rs2 million (Express Tribune) fines. Both makers and sellers are required to be registered and each kite has a QR code (Arab News).
If you just want one kite for yourself or school, consult your district administration. If you are interested in selling, be registered.
Daily Pakistan has announced the latest notice about Basant 2027 in Lahore which has been announced to be held from 12 to 14 March. See all the rules in our Basant festival Lahore 2026 recap and Basant kite festival guide.
Want an easy-to-fly kite?
It takes years to make a good patang and it is not Basant for experimentation. For ready, well balanced kites, please reach out to Basant Kite Shop by calling the phone number / WhatsApp / address provided here.